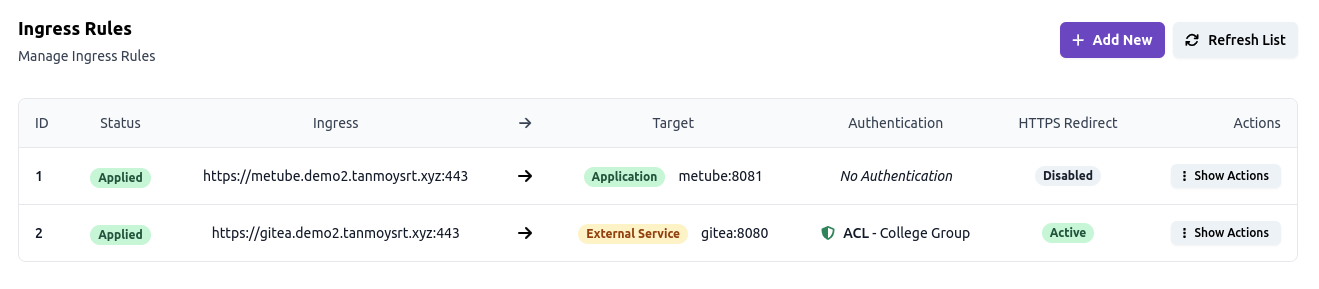
🚪 Ingress Rules
In Ingress Rules section you can manage your ingress rules. You can add or delete ingress rules.
😅 Don't know what ingress rules are ?
In layman's terms, ingress rules are the rules that will connect your domain to your application.
For example, you have an web application (named myapp) running on port 3000 and you want people can access it via https://myapp.com. You can do that by creating an ingress rule that will connect your domain to your application.
myapp.com [https] -> myapp:3000
Add Ingress Rule for Deployed Application
To add an ingress rule, click on Add New button. You will see a form like this:
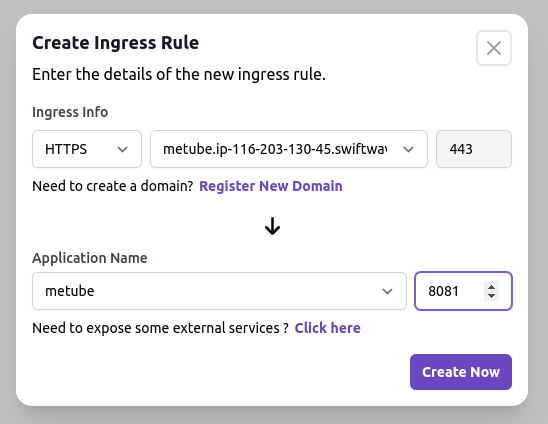
You can choose the protocol your application required.
- HTTP: You can choose any port for your application. It's recommended to use port 80 for HTTP.
- HTTPS: Currently, only port 443 is supported.
Note: Read this guide this docs to enable HTTPS Redirection.
- TCP: If your application relies on TCP protocol, you can choose this option. You can choose any port for your application.
NOTE : In case of TCP, You don't need any domain. You can directly connect your application to your server's IP and port (you choose).
- UDP: If your application relies on UDP protocol, you can choose this option. You can choose any port for your application.
NOTE : In case of UDP, You don't need any domain. You can directly connect your application to your server's IP and port (you choose).
Then, you can choose the domain you want to connect to your application. If you don't have any domain, you can click on Register New Domain to add a new domain.
Finally, you can choose the application you want to connect to your domain.
Hurrah! You have successfully created an ingress rule. Now, you can access your application via your domain. It takes upto 1 minute to apply the changes.
Note : If you have created an ingress rule for port except 80 and 443, you will have to wait for 1~2 minutes to see the effect. This is because, we have to reload HAProxy or UDPProxy and other services to expose the port. You should open the port in your server's firewall too.
Add Ingress Rule for External Application
You can use the integrated proxy in Swiftwave to expose certain applications to the outside world if you are unable to deploy them in swiftwave for some reason.
That external application should use this docker overlay network > swiftwave_network
For that, click on Add New button. In the form, you will see a label Need to expose some external services ?. Click on it and you will see a form like this:
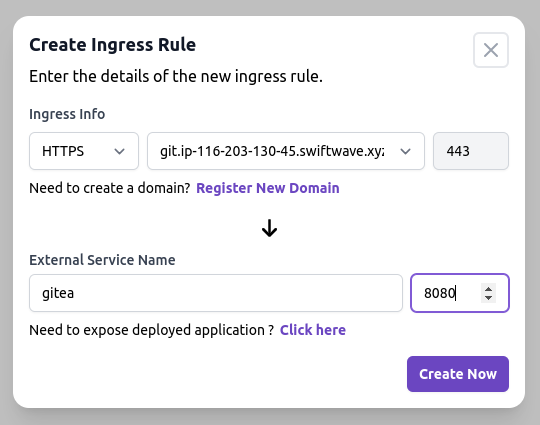
From here, you can type the container / service name of that external application and create an ingress rule for it.
Hurrah!
Delete Ingress Rule
To delete an ingress rule, click on Delete button. You will see a confirmation dialog. Confirm it and your ingress rule will be deleted.
HTTPS Redirection
If you have created an ingress rule on port 443 for HTTPS, you may want to auto-redirect all the traffic from HTTP to HTTPS.
To do that,
- Click on Show Actions button.
- Click on Enable HTTPS Redirect button.
- This can take upto 15 seconds to apply the changes. Refresh the page after that.
Recreate & Fix
Sometimes, for any reason, ingress rules maybe not working properly. In that case, you can recreate the ingress rule and fix the issue.
To do that,
- Click on Show Actions button.
- Click on Recreate & Fix button.
- This can take upto 15 seconds to apply the changes.
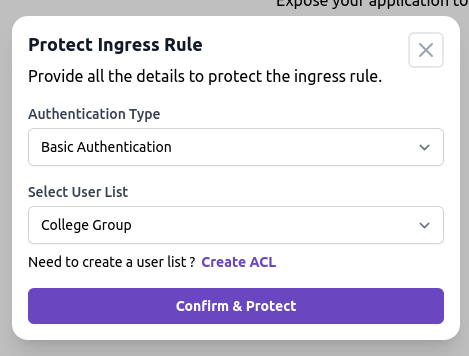
🛡️ Protect Ingress Rule
If your application is misssing authentication implementation, you can enable authentication at ingress rule level.
Currently, it support only Basic Authentication. In future Authelia and Authentik will be supported.
To protect using Basic Authentication,
-
Click on Show Actions button.
-
Click on Setup Authentication button.
-
You will see a form like this:
-
Choose Basic Authentication as the authentication type.
-
Choose the userlist or ACL that you want to use for authentication. Check the docs to learn more about userlist and ACLs.
-
Click on Confirm & Protect button.